
Difficulty: Hard
In this guide we will cover how to add a new menu link to my account page in Woocommerce dashboard. This is very useful when you want to add features (Loyality points) to you webshop and you want to make them accessible through my account page in Woocommerce. In this guide we will be adding a simple “Hello World” text and we will also show you how to display/execute shotrcodes on that custom page.
Table of Contents
TLDR SECTION
This section is for experienced developers who often edit WordPress code.
Dont’t worry if you are unexperienced there is a full guide below this section that will take you step by step on how to implement this solution.
*Please read the comments in the code they will help you understand it and customize it as well
TLDR
File: Functions.php

add_filter ( 'woocommerce_account_menu_items', 'woowiki_menu', 40 );
function woowiki_menu( $menu_links ){
	$menu_links = array_slice( $menu_links, 0, 5, true )
	+ array( '<permalink_name>' => '<Name in the Menu>')
	+ array_slice( $menu_links, 5, NULL, true );
	//By changing number 5 to number 3 For Exmaple
        //this menu item will be 4th then in the menu
        //Change to 0 if you want it to be first
	return $menu_links;
}

add_action( 'init', 'woowiki_add_endpoint' );
function woowiki_add_endpoint() {
	// Adding an endpoint
	add_rewrite_endpoint( '<permalink_name(Same as you used in woowiki_menu function)>', EP_PAGES ); //add_rewrite_endpoint
}

add_action( 'woocommerce_account_<permalink_name(same as you used above)>_endpoint', 'woowiki_my_account_endpoint_content' );
function woowiki_my_account_endpoint_content() {
	//Content of your page
        $short_code = do_shortcode('[my_shortcode]');  //Don't forget to replace with your shortcode
	$html = '<div><p>Hello World</p></div>';  //Sample content Hello World
        $html_short_combined = '<div><p>this is custom html sample combined with shortcode html</p>'.$short_code.'</div>';
	echo $html;
        echo $short_code;
        echo $html_short_combined;
//There is 3 echo statments showing diffrent combinations you can do with output
}
// Dont Forget to go to Settings > Permalinks and just press "Save Changes" button.
// Otherwise your custom menu link won't work
TLDR
Custom CSS
/*Css to add icon to menu*/
/*Change permalink_name to the same name you used in code above*/
woocommerce-MyAccount-navigation-link--<permalink_name> a:before{
background-image: url(<link_to_the_image>);
background-size: contain;
}Adding new menu link to my account
To add a new menu link we need to add some code to the end of funtions.php.
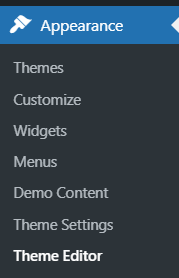
We need to go to the Admin interface and then under Appearance select Theme Editor
After navigating there you will see a windows like this one below. In there select Theme Functions (functions.php).

At the end of the file (functions.php) add this code below.
add_filter ( 'woocommerce_account_menu_items', 'woowiki_menu', 40 );
function woowiki_menu( $menu_links ){
	$menu_links = array_slice( $menu_links, 0, 5, true )
	+ array( '<permalink_name>' => '<Name in the Menu>')
	+ array_slice( $menu_links, 5, NULL, true );
	//By changing number 5 to number 3 For Exmaple
        //this menu item will be 4th then in the menu
        //Change to 0 if you want it to be first
	return $menu_links;
}

add_action( 'init', 'woowiki_add_endpoint' );
function woowiki_add_endpoint() {
	// Adding an endpoint
	add_rewrite_endpoint( '<permalink_name(Same as you used in woowiki_coupons function)>', EP_PAGES ); //add_rewrite_endpoint
}

add_action( 'woocommerce_account_<permalink_name(same as you used above)>_endpoint', 'woowiki_my_account_endpoint_content' );
function woowiki_my_account_endpoint_content() {
	//Content of your page
        $short_code = do_shortcode('[my_shortcode]');  //Don't forget to replace with your shortcode
	$html = '<div><p>Hello World</p></div>';  //Sample content Hello World
        $html_short_combined = '<div><p>this is custom html sample combined with shortcode html</p>'.$short_code.'</div>';
	echo $html;
        echo $short_code;
        echo $html_short_combined;
//There is 3 echo statments showing diffrent combinations you can do with output
}
// Dont Forget to go to Settings > Permalinks and just press "Save Changes" button.
// Otherwise your custom menu link won't work
Editing the code
If you just copy-pasted this code above it won’t work by default, but don’t worry we just need to change few things and then it will be fully working and customized for your use-case.
1.) Locate and change <permalink_name> in function woowiki_menu. This indicates the name that will show in url bar when your menu is open.
2.) Locate and change <Name in the Menu> in function woowiki_coupons. This indicates the name that will be shown in the menu.
3.) Locate and change <permalink_name> in function woowiki_add_endpoint. This needs to be the same as <permalink_name> you used in function woowiki_menu.
4.) Locate and change <permalink_name> in add_action( ‘woocommerce_account…This needs to be the same as <permalink_name> you used in function woowiki_menu.
5.) In function woowiki_my_account_endpoint_content there is 3 examples.
First one $short_code and echo $short_code shows you how to output a shortcode to the custom menu page.
Second one $html and echo $html shows you how to output custom html to the custom menu page.
Third one $html_short_combined and echo $html_short_combined shows you how to combine custom html and output from a shortcode.
That’s it !!!
Your new custom page should be added now in the menu of my account page in Woocommerce.
Adding the icon
If you went to the my account page you can see that your menu link doesn’t have the icon next to it like the others. In order to accomplish that you need to add this custom CSS below.
woocommerce-MyAccount-navigation-link--<permalink_name> a:before{
	background-image: url(<link_to_the_image>);
	background-size: contain;
}
You need to replace <permalink_name> with the permalink name you used in the code above that we implemented in functions.php
Also don’t forget to change <link_to_the_image> to the link of the icon you want to use.
In case you have any questions regarding this guide or need help implementing this solution on your website, please leave a comment below and WooWiki team will help you soon as possible.